
We have many new campers at WLCG, some are seasoned and some have never camped before, but even those of us who have been camping for many years often become complacent and forget some of the basics of getting our trailers ready for winter and the result can cost thousands. Winterizing an RV takes some time and thought, and the consequences to taking shortcuts can be both devastating and costly
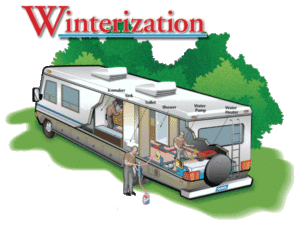
Winterize your Campers Plumbing
If your camper is not being put into heated storage, don’t make the mistake of thinking that your campers plumbing doesn’t need to be winterized. It does. You need to winterize your campers plumbing by either using antifreeze in the lines or by blowing out the lines – or for those who don’t like risk, BOTH.
While it may seem like a hassle to winterize your trailer, it’s far less work than dealing with what happens when a pipe or fitting breaks or connections stretch because of the ice expanding and start leaking – the worst part is often you don’t notice because it’s hidden in the walls or floors and drips for weeks or months causing extensive damage repair.
Don’t Forget Your Outside Shower and Laundry Hookups
A common mistake that many people make is to forget to winterize their outside shower. This is an important camper winterizing tip because the outside shower is often never used and very easy to forget. However, if you fail to winterize your outside shower, plastic fittings and valves will for sure crack, and the pipes that route the water to the outside shower could burst – if not during the winter, when the water is turned back on during the summer months.
PRO TIP: Although our campground is not designed to support washers and dryers, many more expensive trailers come equipped with the hook ups for them, often hidden in a closet the the master bedroom or more commonly in the closet inside the door of a 5th wheel and these are often over looked when winterizing and can do the most damage – you may not even realize your unit has these hookups and have been lucky in past winters but trust me, over time they get weaker and will one day blow so take the minute to winterize them too!
Many of us have winterizing steps recorded on a sheet of paper or in a book be sure to add that note! It’s not hard to do, just run the taps until the water turns pink (or air blows out – but don’t stop at the first bust of air, wait about 20 seconds as there will be spurts of water
Completely Drain and Bypass Your Water Heater
Another common mistake is forgetting the water heater, and that mistake could very easily cost you your water heater. The cost of a new one is (at a minimum) 2K and installation is in most cases extremely difficult making it worth adding it to your winterizing notes!
The first step is to drain your water heater but before you begin, be sure to turn it OFF. You’ll drain it by pulling the drain plug or anode (whichever one your water heater has). Next be sure to open the pressure valve so the tank drains completely (this also helps make sure it is not corroded shut).
Here is another commonly omitted but very important step: Make sure to turn the bypass valves! If you don’t have one, you can get one from any RV dealer. This step is important because if you don’t bypass the tank, when you start to run the antifreeze through your lines, you will need to fill the tank before you can run it through your hot water lines – tanks are anywhere from 5 – 15 gallons in size and that’s a LOT of antifreeze. Also, leaving antifreeze in your tank for the winter means that in the spring, your hot water will have a sweet alcohol smell for a few weeks when you shower (yuck).
Pro Tip: assuming you have a traditional style water heater and a tank ( i.e. not an ON-demand water heater), you don’t have to drain it completely. Any water left in the bottom of the tank will have plenty of room to expand/contract as it freezes/thaws and won’t cause any damage to the water heater. Just be sure that the water lines into and out of the water heater are properly drained or blown out
If you don’t want to replace your water heater come spring, don’t make the mistake of forgetting to prepare your water heater for the winter.
Pro Tip: Anode rods are a major part of your hot water system. If your hot water tank has one, you will see it when you pull out your drain plug on your hot water tank (if there is not one there, your system does not require this step). Anode rods collect materials that can damage your water system (minerals) but over time they also cause your hot water to stink like rotten eggs. Our campground uses a single well to provide water to all campers and the water is hard and full of minerals. You should change this rod annually even if it looks clean when you pull it out. it’s worth the $45 – 50 dollar investment from the campground or your RV dealer
Add Antifreeze to All Drains
Whether you choose to blow out your campers water lines using an air compressor or use antifreeze, make sure you don’t forget to pour some antifreeze down every drain in your camper (including the shower). this simple but important winterizing tip will ensure that the “traps” under your sink do not freeze and crack. The design of all drains is to have what is called a “P Trap” under which intentionally holds water to stop gases from coming back into your unit when other drains are used or toilets are flushed.
Pour at least a cup of antifreeze down each drain. This will also help them stop drying out in the winter / spring and reduce the stink!
Leave Some Antifreeze in the Toilet Bowl
Leave some RV antifreeze in your campers toilet. This helps to protect the seals from damage due to water freezing and keeps them from drying out and needing to be replaced
Remove or Disconnect your 12 Volt Batteries
When preparing your camper for the winter, don’t forget the batteries. if your camper is going to be stored in a heated facilities, simply disconnect the battery’s negative cable and your good to go. If you are leaving your camper at the campground you will need to plan out your strategy. If you are unplugging your camper for the winter then the battery should be disconnected and removed, take it home for the winter and keep it warm but remember – never store it on a concrete floor, it will ruin the battery. if you are leaving the trailer plugged in (because you may use it in the winter) then the battery will continue to be charged throughout the winter by the system.
Regardless of your choice, be sure to check the water level and top it up with distilled water as needed, the charging systems in trailers will at times “over charge” and boil the water out of the battery. RV Batteries are more rugged than automobile batteries but still need some attention
PRO TIP: If you have a large 3 season unit (not a travel trailer) then they don’t have batteries so no need to worry about this step!
Turn Off the Propane Tank and your Furnace
This one is easy to forget but it’s important to turn off your propane tank when closing up your camper for the winter. Be sure to completely turn off the shutoff valve to stop the flow of propane. Most 5th wheels have more than one propane tank so be sure to turn off both tanks. This stops propane from seeping into the trailer and also protects you incase criters decide to chew your rubber lines
PRO TIP: If you have a tank from P38, you don’t have to worry about critters as the lines used are metal.
Many people close up their trailers as late in the season as possible and I don’t blame you but I often hear furnaces trying to start after you go home because the furnace was turned on when the camper was shut down so don’t forget to turn that baby off!
Remove all Food Products
This seems pretty basic but some people leave dry foods behind for the winter. however, unless these are sealed and in rodent proof containers, you’re looking for some trouble! We don’t want to give those little buggers a reason to come into the camper but they have a great sense of smell and determination for food. Same thing with chipmunks – the red ones are destructive so don’t feed them in the summer and do all you can to keep them out in the winter!
Fill Any Openings With Steel/Brass/Copper Wool
This is part of the mouse patrol preparation but worth mentioning as a separate camper winterizing tip. Use steel, brass, or copper wool to fill any openings that could allow the the little devils in. This is important even if you intend to use your camper in the winter.
Mice Squirrels, and other little scoundrels are looking for warmth and food all winter long. If you have either to offer, they will help themselves. You may not realize it but on on sunny day at -10c. your trailer travel trailer will actually warm up in side this due to the low “R” value in the insulation and the fact that it’s basically a coke can with some fibreglass insulation to help take the chill out.
Clean Your Camper Inside and Out
Prior to storing your camper for winter, give it a good cleaning, both inside and outside. Clean the bathroom, sweep floors, vacuum any carpeting well, remove linens (blankets, comforters, and pillows) or store them in vacuum pack bags, clean the kitchen well, and wash the outside of your RV so that you’re not leaving your unit dirty for the winter!
Caring for your RV like this keeps it in good condition, and ready for spring and saves a lot of hard labour in the spring. (Take it from a who’s wife demands the camper be sparkling clean in the fall and spring since 2005.)
Check the Sealants on your Roof and Repair if Necessary
RV roof maintenance is so important and the most often overlooked component for camper preservation but I cannot stress it enough. Preventing leaks is a very important task for the owner of a camper. There are lots of rooftop items that are sealed and those sealants need to be regularly checked for cracks and damage. If you cannot do it yourself, find somebody to do it for you. the few bucks it takes to maintain this is worth it’s weight in gold.
If you make the mistake of neglecting your rooftop sealants, your camper could see some insidious leaks that you have no idea exist until serious and costly damage has occurred – the worst is black mould in the walls – it’s hidden and deadly.
PRO TIP: Don’t forget the seals on your pop-outs. Their many opinions on leaving pop outs open or closed during the winter, but regardless what you choose, remember to check to make sure the seals are properly in place when you open and close them. Using a silicone sealant won’t hurt them either!
Don’t Tarp Your Camper
My second last tip to you is to NOT put tarps over your camper for the winter. you will see as you look at other campgrounds many people will run out to Princess Auto or Peavymart and buy tarps to cover their camper. although this seems like a great idea to help protect it from the elements. if you are going to do this invest in a actual RV cover. Tarps are made on non-breathable material and will cause your camper some serious harm over time because as the sun heats it up, dampness will form between the tarp and your trailer which among other things
The Final Tip for Protecting Your Camper Over the Winter
Here is my final tip – although we monitor the campground through out the winter and do our best to notify you of excessive snow accumulation, pay attention to the amount of snow that falls in the White Lake area – if the snow gets deep consider checking on your camper to ensure that the roof does not need to be cleaned off. Also, a little know fact is that fluffy, fresh snow can weigh as little as three pounds per square foot compared with 21 pounds for wet, heavy snow, Ice weighs more: 57 pounds a square foot
This is an excellent post for seasoned or new campers. Thank you.